Sunday 29 June 2014

Flames of War warriors in 10mm

I use Flames of War rules but I use 10mm / 12mm rather than 15mm. Partly because I started in this scale before I settled on the rules I wanted to use but also because I find that 10mm gives a better effect on a 6 foot by 4 foot table than crowding it with 15mm (I use the same numbers of units and table size for the various scenarios in the FoW books).

However, I like all the warrior units that you can use in FoW so I have made up some of my own for 10mm. This post gives a selection of what I have so far.

For details on decals see my earlier post.

For USA

Lt. Col. Creighton Abrams -  M4A3 (76mm) "Thunderbolt VI" made from a Takara M4A3 hull and the 76mm turret from the Takara M4A1. Various bits of clutter which are from the bits and pieces you get with Takara models and some Arrowhead stowage. The MG is from Pendraken and the crew figure is Arrowhead. I am planning to do "Thunderbolt VI" which is an up-armored M4A3E8 Sherman which I will convert from the Arrowhead model.


Staff Sergeant Lafeyette Pool in an M4A1 (76mm) Sherman. This is the Takara model with track pieces from Takara. The Cullen prong hedge cutter and MG are Pendraken and the crew figure is Arrowhead.


For the British

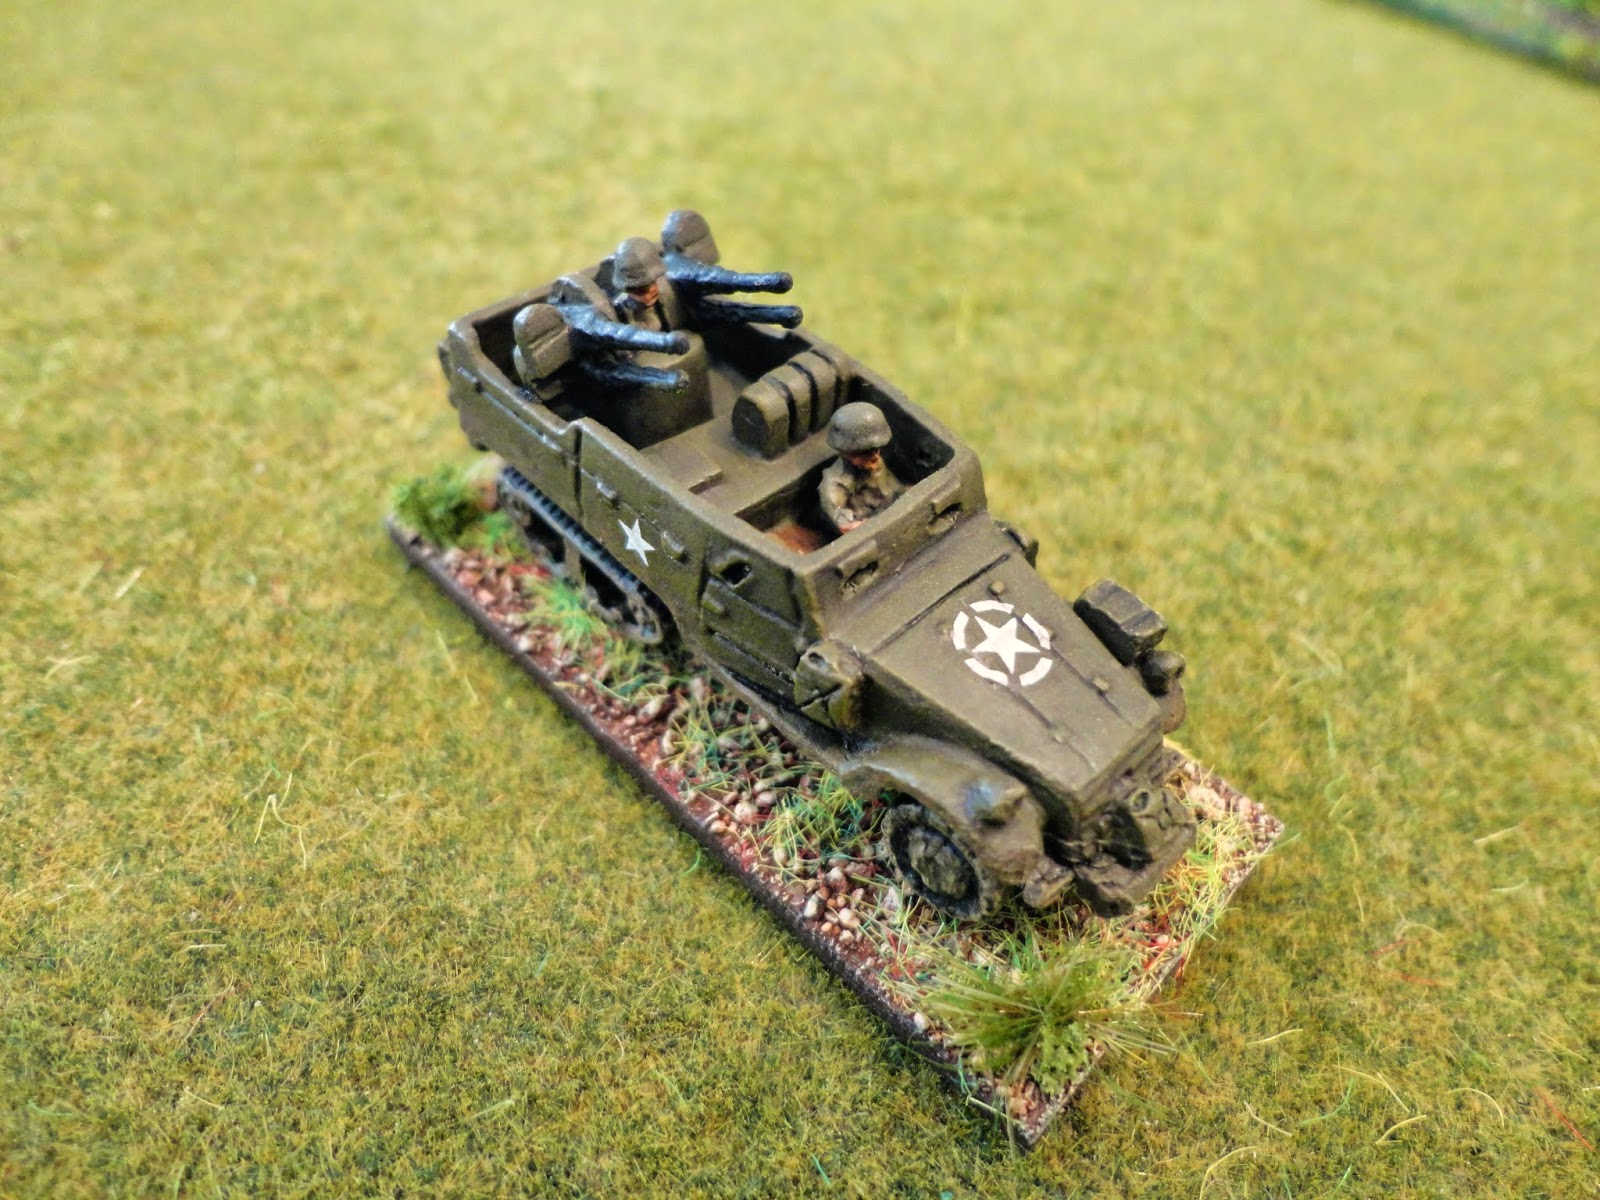
Lieutenant Colonel J.O.E Vandeleur and RAF forward air controller. Vandeleur is an Arrowhead British tank crew figure and it mounted in a Pithead Humber scout car - I drilled out a hole for the figure and used a Panzer Korps brass hatch. The forward air controller is mounted in a Pithead White M3A1 scout car, driver is Pithead, RAF guy is actually a Pendraken Russian AA gun crew man and the radio guy in the back is from the Arrowhead British tank crew set.


For the Germans

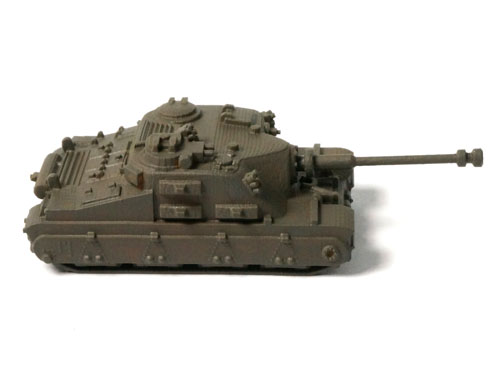
Michael Wittmann in S04. This is a Takara tank but not from their normal range - it comes from a game they did that had 4 grey and 4 yellow unpainted tanks. I liked the Tiger 1 from that set so painted it up for Wittmann rather than use the Takara case special. The crew figure is an Arrowhead German tank crew figure.


Otto Carius in 217. This is just the Takara case special and I have given it a wash and painted the crew figure (the plastic one that came with it or another tank, I forget exactly). I find Takara models do not have the detail painted so I will be painting the bits of equipment on the vehicle at some point.


For the Russians

Marshal Bronetankovyh Voisk Pavel Rotmistrov, Commander of the 5th Guards Tank Army in Operation Bagration. I found him in a scenario on the FoW website.   I used a Pithead Russian jeep, with the crew that came with it and Rotmistrov is an Arrowhead Russian command team figure (actually one of their earlier ones rather than what they sell now).


I will do more as I go along and particularly as I get to scenarios I want to do that use warriors. I will do a further post when I have several more to share.

Waterloo buildings part 1 - Quatre Bras farm

I am in the process of making up a number of the key buildings for the Waterloo campaign. The first one I have finished is the Quatre Bras farm.

I have approximated the farm as best I can. I have used contemporary paintings and photos of the buildings today plus a satellite view from Google maps as pictures are almost always from the front gate and hence difficult to get an idea of the overall layout. I then had to use existing commercially available buildings to try and get the best fit to what I thought it should look like. I used the following:

  • most of the barns are 6mm J&R buildings;
  • the long barn is from a German company's version of La Haye Sainte which I had to cut to get the right shape;
  • the walls and gate are from GHQ;
  • the trees are Timecast;
  • (also an Adler cannon wheel up against the wall in the far corner barn).
Very difficult to tell how accurate it really is but it is a good approximation I think and I am happy with how it has turned out.

Some British gathering to defend the farm:


And some more pictures showing close-ups from different angles:


I am part way through painting the buildings for Gemmincourt farm and also Hougoumont. I have yet to finalize the exact buildings I will use for Hougoumont but I have posted a work in progress on the Perfect Six forum.

I should be doing other posts over the next few weeks and will include La Haye Sainte and Papelotte.


Saturday 28 June 2014

New forum for 6mm Napoleonics

Just a heads up that Perfect Six have created a forum for discussion of all things relating to 6mm Napoleonics. Link over in my favorite links but also here.

I will post on there and I have a few contributions already - this is a good opportunity to contribute to a dedicated forum so please support.


Sunday 22 June 2014

WW2 experimental vehicles part 2 - Tortoise A39

The Tortoise (A39) was a British heavy assault tank design developed in World War II but never put into mass production. It did actually get made and was tested in Germany just after the war. It was very heavy (78 tons) and very slow (top speed 13 mph on the road) and difficult to transport. But had a very powerful gun - the  QF 3.7 inch AA gun (or 32 pdr / 94mm).

This model is a GDG 3D printed version and is using their new material and process and so it is not the fairly horrible rough effect of their previous models (see my Calliopes). The new process can create a sort of ridging effect where you get patterns showing up across flat surfaces.

[this is a picture from a CDG ebay auction - you can see the ridging effect most clearly at the front top above the gun mount]
This ridging effect can easily be removed by sanding or filing - and it takes very little effort as the models are easy to file or sand. However, the only issue is getting in between any detail so depending on the particular model you can remove at least some if not all of this effect.

The material is fairly brittle but as they are mostly cast as a single piece (other than the gun), or very few pieces, then this is not a real issue. I have based mine to help protect against dropping where it might be liable to break (not sure this is absolutely necessary as they feel robust to hold but I base a lot of my vehicle anyway).  The gun is a bendy version of the material so it is pretty robust.

So here are some pictures of mine - just got it today and couldn't wait!  I have managed to smooth down most of the ridging effect. There is a little bit of a pattern left on the front slope around the number 77 decal but this could have been smoothed away - it is just difficult to see if you have got it all out until it is painted. I have another one on the way and will do better next time!


A couple of size comparisons to give you an idea how big this thing is. First against an Arrowhead Cromwell tank:


And finally next to a Dragon CanDo Maus tank:


Saturday 21 June 2014

US WW2 AA and AT halftracks

Some US halftracks with anti-tank or anti-aircraft guns. Also a comparison of different manufacturers at the end.

First the M3 75mm GMC, the vehicles are Minifigs:


and some close ups:


M15 and M16 AA halftracks:


Close up of the M15 halftrack with 37mm AA gun and 2 x 50 cal HMG. Manufacturer is Pendraken:


and the M16 Quad 50 cal AA, manufacturer Pithead:


Now some comparisons with other manufacturers added in - left to right, Takara, New Millennium Toys, Pithead, Minifigs and Pendraken:


The Takara model is the largest but very similar in size to the New Millennium Toys version (note I have repainted that and added a metal HMG from Pendraken).  Pithead and Minifigs are very much of a size, with Pendraken slightly smaller. However, as they are all quite different versions of the US halftrack I find they work fine as they only need to be a small distance apart of any size difference not to be noticeable.

6mm Napoleonic battlefield fortifications

Over the years, I have made or bought various types of redoubts or field fortifications for my 6mm Napoleonics. Hopefully this is a useful run though what is available (that I am aware of) or what you can make.

To note I haven't painted artillery for my Russians yet so throughout I have Austrian artillery defending against Poles and in one case some Saxon cavalry - for my full Pole and Saxon forces check out my earlier post here.

Gabions

These are from Irregular Miniatures and I got them about 30 years ago but they still sell them. I am not at all keen on their figures but they do some useful scenery and it is a big range.


I plan to get some more and make some table level defenses (i.e. rather than the versions seen below which are raised up on hills etc.) with prepared gun positions, although I will probably keep some to just use as seen in the pictures.


The Great Redoubt at Borodino - version 1.

I converted this from a hill many years ago (one of the polystyrene covered in static grass ones you can buy ready made). The trench was made by applying liquid poly glue until it had melted a trench of the right size and depth. The log barricade is made from cocktail sticks. The spiked logs from bits of twigs with pins pushed through. Logs painted and various bits of scatter material added.


In various rules though I need a 6 gun Russian battery so I have always been on the look out for a larger version (see later).


Simple log barricades

At the same time I built the redoubt above I also did a low hill with a couple of simple log barricades added. When I get round to it I want to do some more of these but on low bases for increase flexibility when using on the wargames table.


The Great Redoubt at Borodino - version 2.

This is actually a 10mm model from Old Glory. As shown it is not quite as it comes and there is a lot of enhancement from the base model:
  • The original resin 10mm model came in 3 pieces, but the front of the model is actually the far side of the ditch in my modified version. The back was also a steep drop. Overall the original was about 7cm deep and the same depth across the entire length;
  • I stuck the 3 pieces on to some plasticard I cut out to the shape I wanted - so that there was more depth at the front of the redoubt. At its deepest it is about 19cm from front to back;
  • I then cut out pieces from a 1cm thick sheet of styrene to make the front slope, leaving a gap for the trench. The styrene was cut with a hot wire cutter (small ones are easy to find in models shops and are pretty cheap);
  • The trench was then textured using Polyfilla Woodflex. I also used the Woodflex to get a more gentle slope at the real;
  • I then applied white PVA glue to the front and rear slops and covered in sand (I use a sharp sand from a DIY shop sifted to get the bigger stones out);
  • While the sand was still drying I used a large wooded skewer to make the round pits on the front slope;
  • The ground was painted and flocked in the same sort of way as shown in my basing tutorial. The difference being the last drybrush being Games Workshop bleached bone (now Ushabti bone) rather than white.


I bought this rather than scratch build as I was busy with other things. I was a lot bigger than I was expecting! But other than the gabions being somewhat large compared to the men (and mostly because it is difficult to imagine how they would get them in position rather than looking completely out of place) it does fit the scale pretty well (and I am not sure how you could fit a based 10mm artillery pieces on the gun platforms).  I intend to use for scenarios where it is just about the fighting for the redoubt rather that a wider area of the Borodino battlefield.


Total Battle Miniatures 6mm redoubts.

TBM brought out a range of redoubts for 6mm a year or so ago. Deciding to do this post actually got me to finish them off! (see link on my scenery links page)

This is the larger of the two small ones that come as a single piece. It looks quite nice but I prefer the larger ones - the ditch and grass slope in front just give a better effect. As noted above, I intend to build some small redoubts like this from Irregular Miniature gabions and on low level bases.


You can get two large redoubts that are multi-piece. I did toy with the idea of putting them on a base and filling in the gaps, but while this would look better it also reduces the flexibility that the different parts provide. I bought two - the large and the very large one. Some pictures first of the very large one being attacked by the Poles.


Finally, just a few pictures showing the different configurations possible with the different pieces:

1 - the vary large one as sold:

2 - taking out one of the pieces (could be either left or right one)

3 - the large one as sold (but obviously you can also make that from the very large one by taking out two of the pieces)

4 - a small redoubt just using the end pieces


I hope you enjoyed reading.