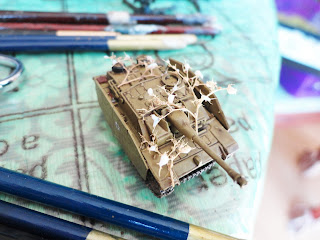
The effect I am going for is this sort of thing:
I came across some materials at Antenocitis Workshop - see their article on how to use. They were for 15mm and the example wasn't a tank so I was not 100% sure it would look the part. To do this you need seafoam sprigs, camouflage leaves and two types of sticky white glue. I got two packs of the sprigs but when they came I think I only needed one as there is lots - one pack in the photo below!
Following the article on their web site I cut some small pieces off the seafoam, tested them out against the model and then put some tacky glue on the back using a brush. The article didn't say anything too specific about how log to wait before putting on the model and the bottle just said to leave the glue a few minutes to go tacky. Not really sure how long to leave for best results but I think it was probably 3 or 4 minutes when I did this and even though still looks white it does stick well to the contours of the model. As you can see below there are a few blobs of white visible as this was taken immediately after sticking to the model. These dry to go clear but a bit shiny - not sure if they eventually go matt but it actually stays tacky for a long time even when you think it has dried and the leaves actually stuck to it later so no shiny bits of glue showing in the end at all.
I stuck 3 pieces on - one either side of the gun and one on the back.
Once the glued appeared to have dried I put some blobs of the other glue - scatter grip - on to branches but trying not to go overboard:
Again not sure how long to leave - the bottle says 30 minutes and to the press the scatter into the glue. The Antenocitis articles did not say anything about waiting and as the seafoam is quite delicate I did not fancy waiting 30 minutes and then pushing the leaves against the branches. I probably left it for 5 to 10 minutes but I guess I then bottled it and dumped the foliage leaves on to the model pressing very gently. Again not sure what the ideal is but stuck no problem with the wait I gave it.
I then though there was a bit too little in terms of leaves..
Here is the finished model. I don't think the photos quite do justice to it as I think it look really good and not at all out of place on a 10mm model. I am now finishing off the rest of the Stugs and will do a post later with all 12 models and some bocage terrain to try and give a better feel for the look.
All in all quite a simple process and I am please with the effect and quite happy to put on things such as my Arrowhead Wespes which are also on the production line.
The tacky glues used for this look quite interesting and I can see my using them for other things. For instance the first is great for gluing the side skirts back on where they are loose (there are posts that slot between the hull and the top of the tracks but are sometimes loose).
_mit_Infanterie.2.jpg)


No comments:
Post a Comment